URP 渲染实战 / 第 7 章 法线贴图与视差 / 案例 7.8
案例 7.8POM 砖墙:从单步到光线步进高阶
目标:实现 Steep 与 POM,并做三组对比:四种模式、层数对台阶的影响、高度缩放对深度感的影响。Steep 的实现:
Assets/Cookbook/Ch07/Parallax.hlsl(节选:steep)
// 陡峭视差(Steep Parallax):把 [0,1] 深度切成 numLayers 层,沿视线一层层往里走,
// 直到“视线深度”第一次超过“高度图深度”。返回命中点 UV;hitDepth 输出命中深度。
float2 SteepParallax(TEXTURE2D_PARAM(heightMap, sampler_heightMap), float2 uv, half3 viewDirTS,
                     float scale, float minLayers, float maxLayers, out float hitDepth)
{
    float2 dx = ddx(uv), dy = ddy(uv);
    // 正视时层数少,掠射时层数多:掠射时每层在 UV 上走得更远,需要更细的步长
    float numLayers = lerp(maxLayers, minLayers, saturate(viewDirTS.z));
    float layerDepth = 1.0 / numLayers;
    // 视线每深入 1 个单位,UV 偏移 V.xy / V.z * scale(相似三角形);方向与视线相反
    float2 deltaUV = viewDirTS.xy / max(viewDirTS.z, 0.05) * scale / numLayers;

    float rayDepth = 0;
    float mapDepth = CH07_DEPTH(uv);
    [loop] for (int i = 0; i < CH07_MAX_STEPS && rayDepth < mapDepth; i++)
    {
        uv -= deltaUV;
        mapDepth = CH07_DEPTH(uv);
        rayDepth += layerDepth;
    }
    hitDepth = rayDepth;
    return uv;
}
// 陡峭视差(Steep Parallax):把 [0,1] 深度切成 numLayers 层,沿视线一层层往里走,
// 直到“视线深度”第一次超过“高度图深度”。返回命中点 UV;hitDepth 输出命中深度。
vec2 SteepParallax(sampler2D heightMap, vec2 uv, vec3 viewDirTS,
                   float scale, float minLayers, float maxLayers, out float hitDepth)
{
    vec2 dx = dFdx(uv), dy = dFdy(uv);
    // 正视时层数少,掠射时层数多:掠射时每层在 UV 上走得更远,需要更细的步长
    float numLayers = mix(maxLayers, minLayers, saturate(viewDirTS.z));
    float layerDepth = 1.0 / numLayers;
    // 视线每深入 1 个单位,UV 偏移 V.xy / V.z * scale(相似三角形);方向与视线相反
    vec2 deltaUV = viewDirTS.xy / max(viewDirTS.z, 0.05) * scale / numLayers;

    float rayDepth = 0.0;
    float mapDepth = CH07_DEPTH(uv);
    for (int i = 0; i < CH07_MAX_STEPS && rayDepth < mapDepth; i++)
    {
        uv -= deltaUV;
        mapDepth = CH07_DEPTH(uv);
        rayDepth += layerDepth;
    }
    hitDepth = rayDepth;
    return uv;
}
几个工程细节:
- 自适应层数:
lerp(maxLayers, minLayers, saturate(V.z))。正视时 V.z ≈ 1,视线在 UV 上几乎不移动,少量层数就够了;掠射时 V.z 很小,每层在 UV 上走得很远,需要更多层才不会“跨过”薄薄的凸起。 - 循环中的采样:GPU 计算 mip 需要隐式导数,而导数在动态循环里没有定义(同一 2×2 像素块的四个像素可能执行不同次数的循环)。所以循环前先用
ddx/ddy求出原始 uv 的导数,循环里用SAMPLE_TEXTURE2D_GRAD显式传入。宏CH07_DEPTH就是为了让这个写法不那么啰嗦。 - 循环上限:
CH07_MAX_STEPS防止极端情况下步数失控;[loop]提示编译器不要展开。 - 分母保护:
max(V.z, 0.05)防止掠射角下除以接近 0 的数。
POM 在 Steep 的循环之后,多一次采样和一次插值:
Assets/Cookbook/Ch07/Parallax.hlsl(节选:pom)
// 视差遮挡映射(POM):在 Steep 的基础上,对“穿过表面前后”的两层做一次线性插值,
// 把台阶状的命中点修正到两层之间,低层数也能得到平滑结果。
float2 ParallaxOcclusion(TEXTURE2D_PARAM(heightMap, sampler_heightMap), float2 uv, half3 viewDirTS,
                         float scale, float minLayers, float maxLayers, out float hitDepth)
{
    float2 dx = ddx(uv), dy = ddy(uv);
    float numLayers = lerp(maxLayers, minLayers, saturate(viewDirTS.z));
    float layerDepth = 1.0 / numLayers;
    float2 deltaUV = viewDirTS.xy / max(viewDirTS.z, 0.05) * scale / numLayers;

    float rayDepth = 0;
    float mapDepth = CH07_DEPTH(uv);
    [loop] for (int i = 0; i < CH07_MAX_STEPS && rayDepth < mapDepth; i++)
    {
        uv -= deltaUV;
        mapDepth = CH07_DEPTH(uv);
        rayDepth += layerDepth;
    }

    // 穿透后(after)与穿透前(before)两层,各自“视线深度 - 高度图深度”的差
    float2 prevUV = uv + deltaUV;
    float after  = mapDepth - rayDepth;                              // ≤ 0
    float before = CH07_DEPTH(prevUV) - (rayDepth - layerDepth);     // ≥ 0
    float w = after / (after - before + 1e-5);                       // 两段直线的交点比例
    hitDepth = lerp(rayDepth, rayDepth - layerDepth, w);
    return lerp(uv, prevUV, w);
}
// 视差遮挡映射(POM):在 Steep 的基础上,对“穿过表面前后”的两层做一次线性插值,
// 把台阶状的命中点修正到两层之间,低层数也能得到平滑结果。
vec2 ParallaxOcclusion(sampler2D heightMap, vec2 uv, vec3 viewDirTS,
                       float scale, float minLayers, float maxLayers, out float hitDepth)
{
    vec2 dx = dFdx(uv), dy = dFdy(uv);
    float numLayers = mix(maxLayers, minLayers, saturate(viewDirTS.z));
    float layerDepth = 1.0 / numLayers;
    vec2 deltaUV = viewDirTS.xy / max(viewDirTS.z, 0.05) * scale / numLayers;

    float rayDepth = 0.0;
    float mapDepth = CH07_DEPTH(uv);
    for (int i = 0; i < CH07_MAX_STEPS && rayDepth < mapDepth; i++)
    {
        uv -= deltaUV;
        mapDepth = CH07_DEPTH(uv);
        rayDepth += layerDepth;
    }

    // 穿透后(after)与穿透前(before)两层,各自“视线深度 - 高度图深度”的差
    vec2 prevUV = uv + deltaUV;
    float after  = mapDepth - rayDepth;                              // ≤ 0
    float before = CH07_DEPTH(prevUV) - (rayDepth - layerDepth);     // ≥ 0
    float w = after / (after - before + 1e-5);                       // 两段直线的交点比例
    hitDepth = mix(rayDepth, rayDepth - layerDepth, w);
    return mix(uv, prevUV, w);
}
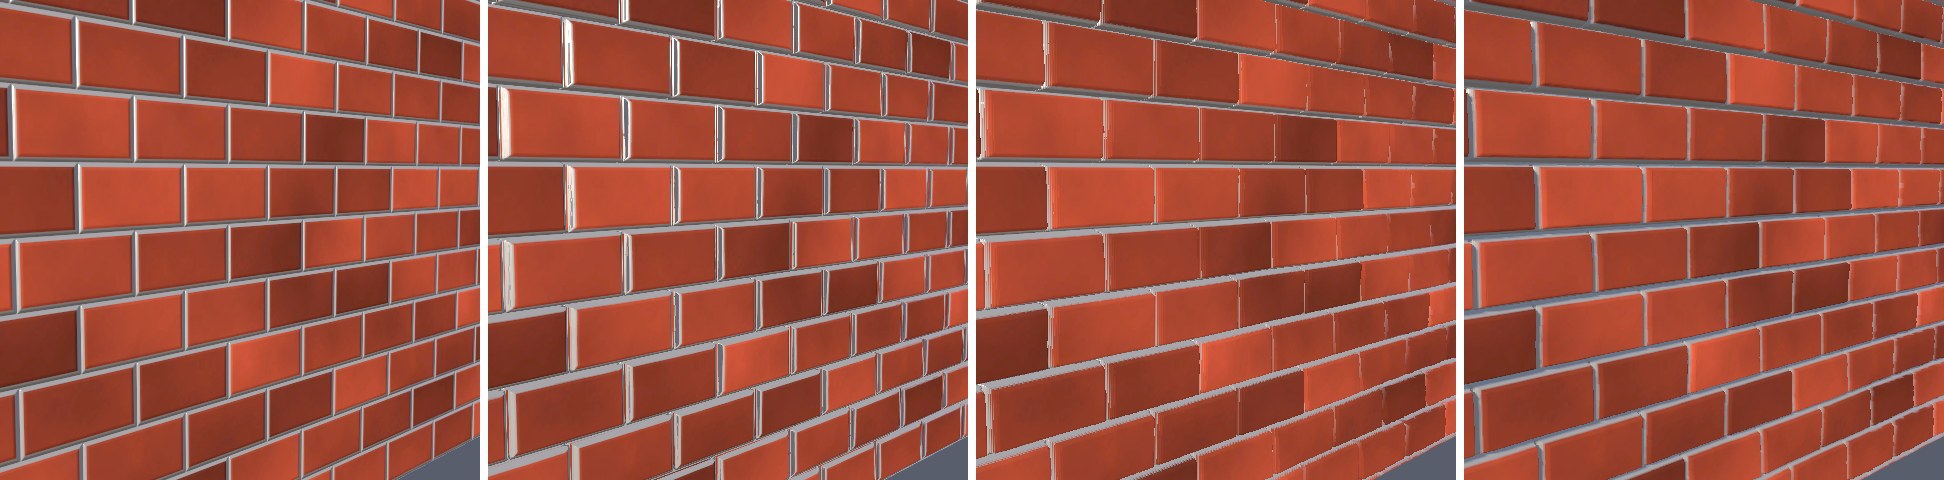
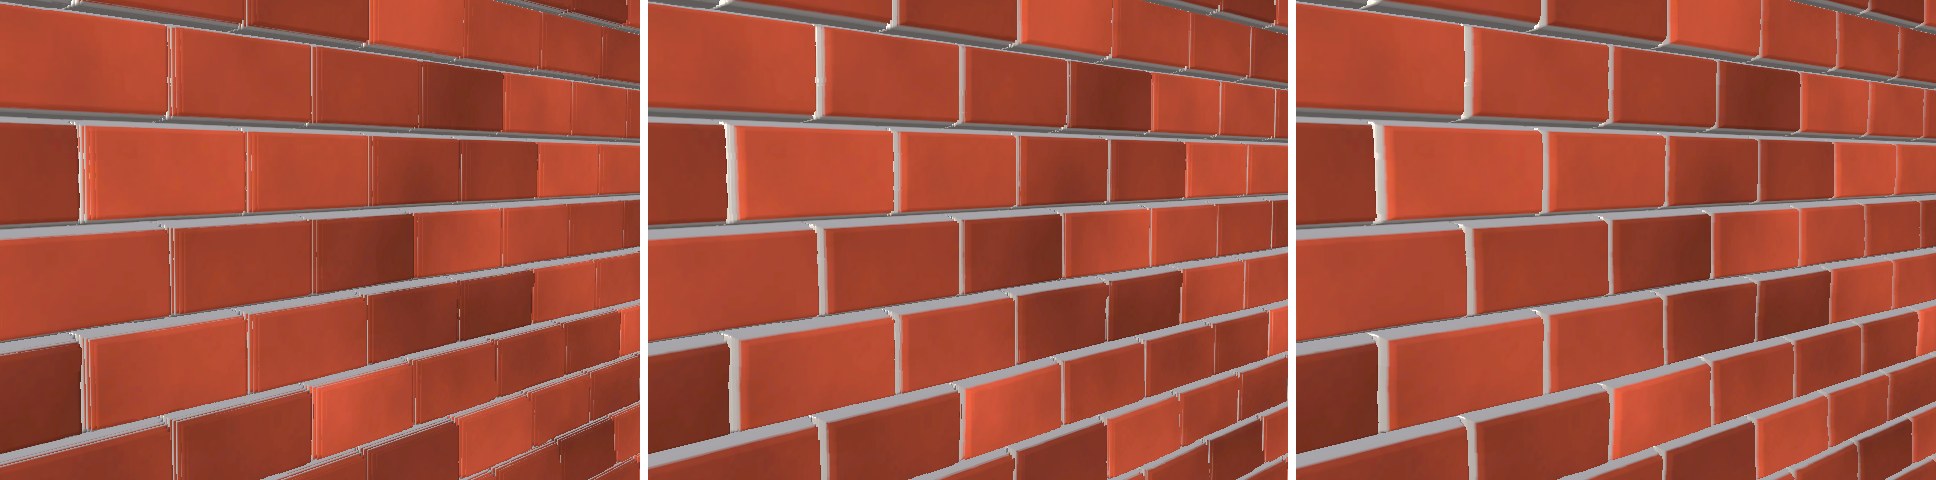
图 7-16 很好地说明了 POM 的价值:同样 8 次步进,Steep 的台阶清晰可见,POM 只剩下轻微的形变。实际项目里,POM 的层数一般在 8~32 之间,按视角自适应;Steep 很少单独使用。
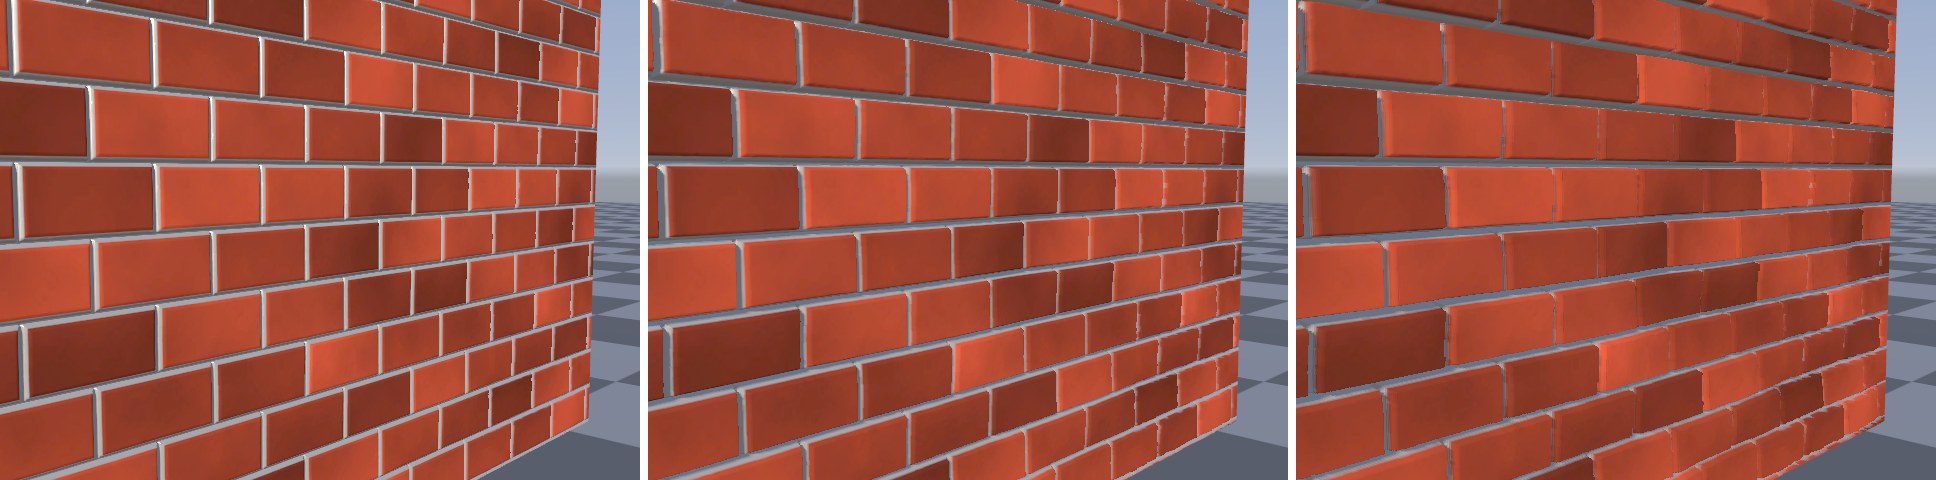
Height Scale 是以 UV 为单位的“最大深度”。本例中贴图平铺后每个 UV 单位约等于 1.4 米,0.06 意味着砖缝最深约 8 厘米。缩放越大,同样层数下每层跨过的 UV 距离越长,掠射角下越容易漏掉薄的凸起,表现为图 7-17 右图远处的断裂。经验上,深度感主要靠“近处的遮挡”建立,没必要追求很大的缩放;如果确实需要很深的凹凸(例如窗洞),应当用真实几何或曲面细分。